
In today’s fast-paced world, finding the time to bake homemade bread might seem like a daunting task, especially for busy families juggling work, school, and various commitments. However, fear not! This sourdough recipe is tailored perfectly for those on-the-go lifestyles, seamlessly fitting into the schedules of both working professionals and those who manage their tasks from home. With minimal effort and a bit of patience, you’ll soon be enjoying freshly baked sourdough bread that not only nourishes the body but also brings a sense of satisfaction and warmth to the home. Let’s dive into the recipe and discover how easy it is to incorporate the art of sourdough baking into your bustling routine.
Furthermore, beyond the huge cost savings (I estimate it costs just under $1 per loaf using organic flour!), homemade sourdough offers a multitude of health benefits that set it apart from commercially produced bread. Unlike its mass-produced yeasted bread, sourdough undergoes a natural fermentation process, which helps to break down gluten and phytic acid, making it easier to digest. Additionally, this fermentation process enhances the bioavailability of nutrients, such as vitamins and minerals, present in the flour, ensuring that your body can absorb them more effectively.1 By choosing sourdough over commercial bread, you’re not only treating yourself to delicious homemade goodness but also nourishing your body with a wholesome, nutrient-rich option that supports your digestive well-being.
Embarking on the journey of sourdough baking for the first time can be both exciting and a bit intimidating. Don’t be discouraged if your initial attempts don’t turn out exactly as planned—like any craft, mastering the art of sourdough takes practice and patience. Embrace the process, learn from each loaf, and soon you’ll find yourself reveling in the joy of pulling a perfectly risen, golden-brown sourdough from your oven. There’s something truly special about slicing into a loaf you’ve lovingly nurtured from start to finish, and the satisfaction of sharing that first bite with your family is incomparable. So, roll up your sleeves, dust off your apron, and let’s dive into the wonderful world of sourdough together!
White Sourdough (makes 1 loaf)
This recipe is great for beginners and invloves no specialized equipment other than a kitchen scale and a large baking pot with lid (Dutch oven).
400g unbleached white flour (I use Boreal Premium Organic Flour from Costco)
230g water
160g sourdough starter
5g sea salt
Olive oil
Rice Flour or Gluten-Free Flour for dusting bowl
Instructions:
- Using a kitchen scale, measure out 200g flour, 230g water and 160g sourdough starter into a bowl. Mix to form a thick batter, cover the bowl with beeswax wrap/plastic wrap and allow to rise in a warm spot (e.g., on top of the fridge, in the oven with the oven light on, inside microwave with the light one) for 30 mins. This batter is called the levain.
- Mix in 200g flour and 5g salt until it becomes a rough dough. Knead by hand on an unfloured surface until it passes the “windowpane effect”, about 8-10 mins. Dough will become smooth, soft and very elastic. When kneading, the dough will be sticky and wet, try not to add any extra flour. If using a KitchenAid Mixer, use the dough hook at speed 4, and knead for 5 minutes.
- Transfer the dough to a lightly oiled bowl, turning once to coat the dough. Cover bowl with beeswax wrap/plastic wrap and allow to rise in a warm spot. After 30 minutes uncover the bowl, lift one side of the dough over into the middle of the dough. Repeat with the other three sides of the dough then flip the dough over. (This process is called stretch and fold) Cover the bowl and after 30 minutes repeat the procedure. Cover the bowl and after 60 minutes repeat the procedure. Cover the bowl and let rise for 60 minutes.(In total, dough is rising for 3 hours.) By now the dough should be lively, elastic and airy. If the dough is still sluggish give it another hour or two.
- Turn dough out onto a very lightly floured surface. Shape dough into a ball by pulling it out flat and then folding it in half and then folding the short ends into the center. Pull the edges under to create tension on the top of the dough.
- Prepare a proofing basket by lining a bowl with a smooth clean tea towel. Dust towel with gluten-free flour or rice flour to prevent sticking.
- Place the dough upside down into the towel lined basket, with the good side down. Put bowl into a plastic bag and seal to keep all moisture in.
- Allow for dough to rise/proof for another 3-4 hours in a warm spot or 12 hours in the fridge. You will know the dough is ready when it springs back when touched, only leaving a slight finger indentation.
- Preheat oven, with the dutchoven inside, to 450F for at least 30 minutes.
- Carefully turn the dough from the proofing basket onto a large square of parchment paper (or directly into a lightly floured hot dutchoven), removing the towel. You should have a nice round top facing up.
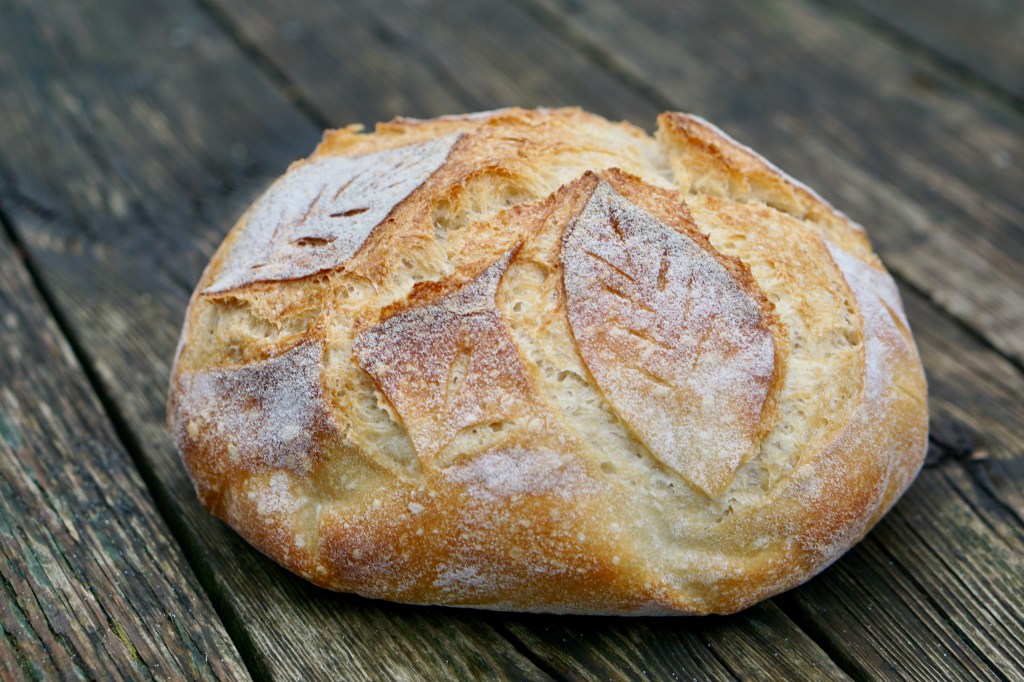
- Using a very sharp knife cut the surface of the dough about 0.5cm deep. This will allow the dough to rise while baking. Be creative with your cutting design as this is your baker’s signature!
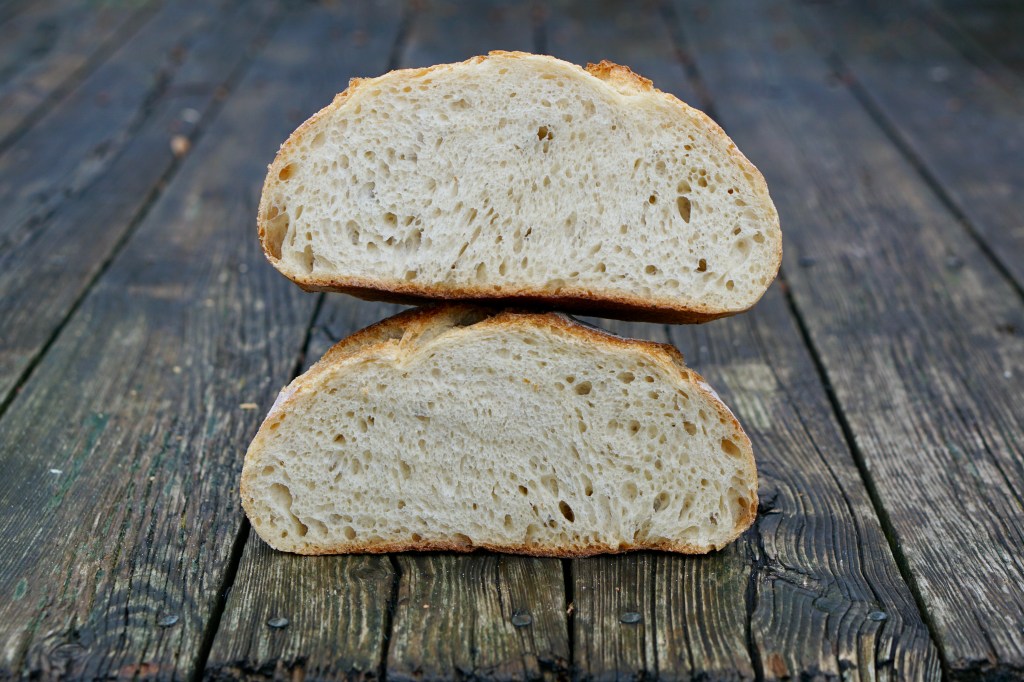
- Lift the parchment paper and place dough into the hot dutchoven, cover with lid. Bake for 30mins with the lid on, and then bake 15 more minutes with the lid off. The bread should dark brown in colour, with an internal temperature of 208F.
- Transfer to wire rack to cool. Try your best to allow loaf to completely cool before cutting. Enjoy!
Sample Sourdough Schedule:
| 7am | Take starter out of fridge and let it rise to at least double in size. There is no exact timing on this, just keep an occasional eye on it. I try to use mine between double and triple the original size. |
| 6pm | Once starter has at least doubled in size, use the very bubbly starter to make the levain. (200g flour, 230g water, 160g starter) Put levain in a warm spot for 30 mins. At this time, also “feed” the starter: In a glass jar mix 80g of left-over bubbly starter which is in the jar, 80g water & 80g flour. Immediately put starter it back into fridge after it has been fed. The starter can now be used every day to every two days if stored in the fridge. Just take the starter out of the fridge and allow to double/triple in size. |
| 6:30pm | Make dough (mix in 200g flour & 5g salt), knead and put into oiled bowl. Let rise for 30 mins. |
| 7:00pm | Stretch and fold, let rise for 30 mins. |
| 7:30pm | Stretch and fold, let rise for 60 mins. |
| 8:30pm | Stretch and fold, let rise for 60mins. (Dough rising for 3 hours in total) |
| 9:30pm | Shape dough and put into a gluten-free floured proofing basket. Seal into a plastic bag, put dough into fridge, and allow to rise overnight. |
| Next day: | |
| 7:00am | Preheat oven to 450 & Dutch oven for at least 30 mins |
| 7:30am | Cook sourdough (30mins with cover on, 15 mins with cover off). Allow to cool on a cooling rack before cutting. |


Leave a comment